Oracle has introduced new Multitenant Option from Oracle 12cR1 and this option allows a single container database (CDB) to host multiple pluggable databases.
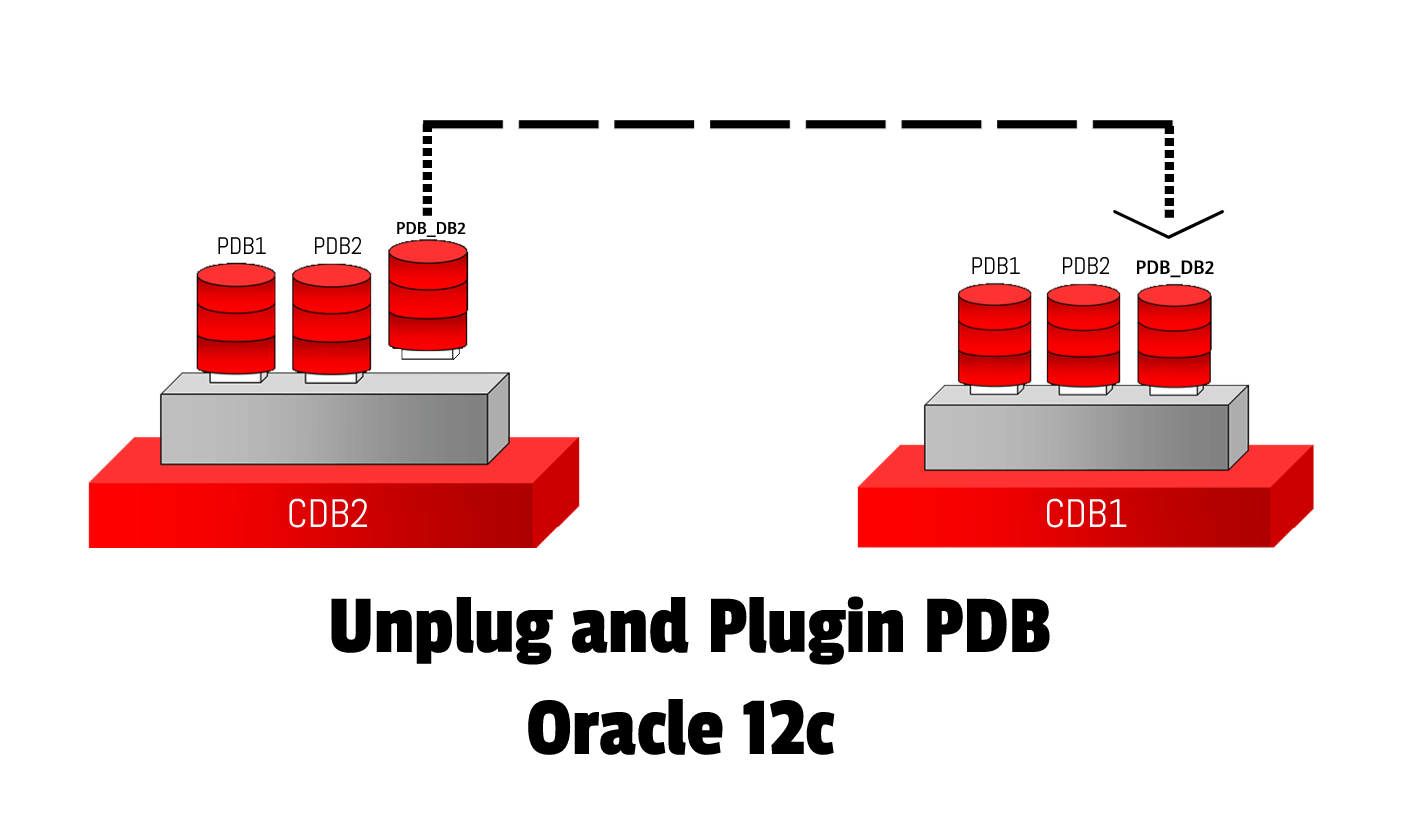
One of the most powerful feature of Oracle Multitenant is Unplug and Plug In a PDB from one CDB to another CDB.
Refer here for more details on Oracle Multitenant option.
Description:
In this post I will describe how to Unplug and Plugin a PDB from one CDB to another CDB in Oracle 12c. Here I have used 2 CDBs running on the same VM. Below are the details,
Source CDB: CDB2 –> Unplug pdb_db2 from cdb2
Target CDB: CDB1 –> Plug pdb_db2 to cdb1
SQL> select d.name db_name, p.name pdb_name, p.open_Mode from v$pdbs p, v$database d;

DB_NAME   PDB_NAME        OPEN_MODE
--------- --------------- ----------
CDB2      PDB$SEED        READ ONLY
CDB2      PDB1            READ WRITE
CDB2      PDB2            READ WRITE
CDB2      PDB3            READ WRITE
CDB2      PDB_DB2_NEW     READ WRITE
CDB2      PDB_DB2         READ WRITE

SQL> select d.name db_name, p.name pdb_name, p.open_Mode from v$pdbs p, v$database d;

DB_NAME   PDB_NAME        OPEN_MODE
--------- --------------- ----------
CDB1      PDB$SEED        READ ONLY
CDB1      PDB1            READ WRITE
In the below example I will unplug pdb_db2 from CDB2 and plugin to CDB1.
Below are the steps:
Unplug the PDB from CDB
- Connect to the source CDB ( as sysdba)
- Close the PDB to unplug
- Unplug the PDB
- Drop the PDB pdb_db2 by preserving the datafiles
- Verify the status of the unplugged PDB
Plug In the PDB to CDB
- Connect to the target CDB ( as sysdba)
- Run DBMS_PDB.CHECK_PLUG_COMPATIBILITY Function
- Plug In the PDB using the metadata (xml) file
- Open the PDB database
Unplugging the PDB pdb_db2 from CDB cdb2
- Connect to the source CDB ( as sysdba)
Set the DB Environment to connect source CDB and connect to CDB$ROOT using sysdba privilege
[oracle@cdb12c ~]$ . oraenv
ORACLE_SID = [cdb2] ?
The Oracle base remains unchanged with value /u01/app/oracle
[oracle@cdb12c ~]$ sqlplus

SQL*Plus: Release 12.2.0.1.0 Production on Thu Feb 11 03:44:53 2021

Copyright (c) 1982, 2016, Oracle.  All rights reserved.

Enter user-name: /as sysdba

Connected to:
Oracle Database 12c Enterprise Edition Release 12.2.0.1.0 - 64bit Production

SQL> show con_name;

CON_NAME
------------------------------
CDB$ROOT
SQL>
2. Close the PDB(pdb_db2) to unplug
Before unplugging, the pdb has to be closed.
select name, open_mode from v$pdbs;
alter pluggable database pdb_db2 close;

o/p:
SQL> select name, open_mode from v$pdbs;

NAME            OPEN_MODE
--------------- ----------
PDB$SEED        READ ONLY
PDB1            READ WRITE
PDB2            READ WRITE
PDB3            READ WRITE
PDB_DB2_NEW     READ WRITE
PDB_DB2         READ WRITE

6 rows selected.

SQL> alter pluggable database pdb_db2 close immediate;

Pluggable database altered.
3. Unplug the PDB
Unplug the closed PDB and then specify the path and name of the XML file.
alter pluggable database pdb_db2 unplug into '/u01/pdb_clone/pdb_db2.xml';
select name, open_mode from v$pdbs;

o/p:
SQL> alter pluggable database pdb_db2 unplug into '/u01/pdb_clone/pdb_db2.xml';

Pluggable database altered.

SQL> select name, open_mode from v$pdbs;

NAME            OPEN_MODE
--------------- ----------
PDB$SEED        READ ONLY
PDB1            READ WRITE
PDB2            READ WRITE
PDB3            READ WRITE
PDB_DB2_NEW     READ WRITE
PDB_DB2         MOUNTED

6 rows selected.
4. Drop the PDB pdb_db2 by preserving the datafiles
Drop the closed PDB and keep the data files.
Specify KEEP DATAFILES to retain the data files associated with the PDB after the PDB is dropped. The temp file for the PDB is deleted because it is no longer needed. This is the default.
drop pluggable database pdb_db2 keep datafiles;
select name, open_mode from v$pdbs;

o/p:

SQL> drop pluggable database pdb_db2 keep datafiles;

Pluggable database dropped.

SQL>
SQL> select name, open_mode from v$pdbs;

NAME            OPEN_MODE
--------------- ----------
PDB$SEED        READ ONLY
PDB1            READ WRITE
PDB2            READ WRITE
PDB3            READ WRITE
PDB_DB2_NEW     READ WRITE
5. Verify the status of the unplugged PDB
select name, open_mode from v$pdbs where name ='PDB_DB2';

SQL> select name, open_mode from v$pdbs where name ='PDB_DB2';

no rows selected
Successfully unplugged the PDB pdb_db2 from CDB cdb2, Now let see how to plug this PDB to CDB1.
Plug In the PDB pdb_db2 to CDB1
- Connect to the target CDB ( as sysdba)
Set the environment variable of target CDB and connect to CDB$ROOT as sysdba
.oraenv
sqlplus "/as sysdba"
show con_name

o/p:

[oracle@cdb12c admin]$ . oraenv
ORACLE_SID = [cdb2] ? cdb1
The Oracle base remains unchanged with value /u01/app/oracle
[oracle@cdb12c admin]$ sqlplus

SQL*Plus: Release 12.2.0.1.0 Production on Thu Feb 11 04:12:40 2021

Copyright (c) 1982, 2016, Oracle.  All rights reserved.

Enter user-name: /as sysdba

Connected to:
Oracle Database 12c Enterprise Edition Release 12.2.0.1.0 - 64bit Production

SQL> show con_name

CON_NAME
------------------------------
CDB$ROOT
SQL>
2. Run DBMS_PDB.CHECK_PLUG_COMPATIBILITY Function
Before Plug In the database make sure the unplugged PDB is compatible with the new host.
SET SERVEROUTPUT ON
DECLARE
 compatible CONSTANT VARCHAR2(3) :=
  CASE DBMS_PDB.CHECK_PLUG_COMPATIBILITY(
      pdb_descr_file => '/u01/pdb_clone/pdb_db2.xml',
      pdb_name => 'pdb_db2')
  WHEN TRUE THEN 'YES'
  ELSE 'NO'
END;
BEGIN
 DBMS_OUTPUT.PUT_LINE(compatible);
END;
/

o/p:
SQL> SET SERVEROUTPUT ON
DECLARE
 compatible CONSTANT VARCHAR2(3) :=
  CASE DBMS_PDB.CHECK_PLUG_COMPATIBILITY(
      pdb_descr_file => '/u01/pdb_clone/pdb_db2.xml',
      pdb_name => 'pdb_db2')
  WHEN TRUE THEN 'YES'
  ELSE 'NO'
END;
BEGIN
 DBMS_OUTPUT.PUT_LINE(compatible);
END;
/
YES

PL/SQL procedure successfully completed.
3. Plug In the PDB using the metadata (xml) file
create pluggable database pdb_db2 using '/u01/pdb_clone/pdb_db2.xml' NOCOPY TEMPFILE REUSE;
select con_id, name, open_mode from v$pdbs;
select name from v$datafile where con_id=4;

o/p:

SQL> create pluggable database pdb_db2 using '/u01/pdb_clone/pdb_db2.xml' NOCOPY TEMPFILE REUSE;

Pluggable database created.

SQL>
SQL> select con_id, name, open_mode from v$pdbs;

    CON_ID NAME            OPEN_MODE
---------- --------------- ----------
         2 PDB$SEED        READ ONLY
         3 PDB1            READ WRITE
         4 PDB_DB2         MOUNTED

SQL> select name from v$datafile where con_id=4;

NAME
------------------------------------------------
/u01/app/oracle/oradata/cdb2/pdb_db2/CDB2/B92E25114D543C30E053D138A8C0059C/datafile/o1_mf_system_j0c54z1f_.dbf
/u01/app/oracle/oradata/cdb2/pdb_db2/CDB2/B92E25114D543C30E053D138A8C0059C/datafile/o1_mf_sysaux_j0c54z1o_.dbf
/u01/app/oracle/oradata/cdb2/pdb_db2/CDB2/B92E25114D543C30E053D138A8C0059C/datafile/o1_mf_undotbs1_j0c54z1o_.dbf
/u01/app/oracle/oradata/cdb2/pdb_db2/CDB2/B92E25114D543C30E053D138A8C0059C/datafile/o1_mf_users_j0c54z1p_.dbf
4. Open the PDB database
Open and check the status of the plugged PDB.
alter pluggable database pdb_db2 open;
conn faheem/faheem@cbd12c:1521/pdb_db2
select * from tab;

o/p:
SQL> alter pluggable database pdb_db2 open;

Pluggable database altered.

SQL>  conn faheem/faheem@cdb12c:1521/pdb_db2
Connected.

SQL> select * from test;

        ID
----------
         1
We have succesfully unplug and plug pdb_db2 from cdb2 to cdb1.
Hope this helps..


 Visit Today : 89
 Total Visit : 522538
 Total Hits : 1442864
 Who's Online : 5